Sunday 16 August 2015

" Sisters Together "

Hi all and welcome back to my little blog.
Today I am sharing a layout that I have created as part of the Design Team at CSI

I love working with the case files at CSI. I just get so much inspiration when I first receive them. 
Sometimes its the  colours that starts me or the embellishments (evidence) or sometimes it will be the journalling, but what ever the starting point is I think that the case files are fantastic way to get that mojo going.

This is case file 173.

This is a photo of my granddaughters Emelia on the right and Eliza. Their Mum snapped this gorgeous photo of older sister helping her little sister getting dressed.
We are hoping to take the same photo when one of them is getting married and the other is helping getting her sister dressing for the big day.
Planning my scrapping ahead.


For the background I have placed strips of paper vertical on the cardstock 
slanting it down the page (as per evidence)
Then I added the green paint, plasterers tape and grid stencil with Texture paste. Finished off the background with some black stamping.

Case File Elements:
The Scheme (colours) Light sea foam green, dark teal green, carnation pink, maraschino cherry red and white.
The evidence: I have used, grid pattern, flowers, wet medium, animals, leaves, labels, flourishes, slant something and distressing.
The Journalling: I used the Presentation idea for my journalling.
I journaled on the top of the page on the zig zag pattern of the middle paper. It says IDEA; I am going to photograph these two when one of them gets married. I think the two photos will be wonderful scrapped together.


You can see all the layers and textures that I have put on this page.
I fussy cut out some flowers and added them to the clusters


I decided to ink all the chipboard with black to make it stand out on the layout.
I think this title by ScrapFX is just perfect.


I love to add Kaisercut outs to my pages and this one is no different. 
I have on on each side of the photo. You can see little bits of 
black flourish peeking out of the clusters. 
The green flowers were white I have painted them with silks to 
match the colours in the layout.


White leaves, something I don't use very often but they look 
so good on this page. I distressed the edges, inked and stamped
a stitches border, one I use on most of my layouts..


My journalling is on the middle paper on the zig zag. 
Something a little different.

Some of the products I have used.
Card stock
pattern paper
Bo Bunny "star crossed" Collection pack
stencil
texture paste
Kaisercut outs
Kaiser stamps
Archival inks
distress inks
D-lish flowers
plasterers tape
resin embellishments
Net butterflies

thanks for stopping by
Till next time
Keep on scrapping

Carol xx


Saturday 15 August 2015

" Simply Us"

Hi everyone and so nice to see you here again.
Today I have a real girly layout that I created as part of the Design Team at D-lish Scraps

This is a photo of my youngest granddaughter Eliza and my Mum whom the girls lovingly call 
" Little Nanny"
These are possibly the biggest and best smiles I have ever seen. I'm just not sure what Eliza is doing to the back of Mum's head.


I'm loving the tearing of the papers and this time I decided to tear  
and position them vertically.
I inked some white lace with black Dylusions ink and popped
 it in between the layers.
Inked all the edges.


I stenciled some Damask pattern with Impasto and the background and applied colour with my Gelatos. 
Lots and lots of black stamping. 
I wanted to create a real girly layout with flowers and lace 
then the bright colours against the black, stunning.


I inked all the chipboard with black Archival ink. I placed the reedy chipboard upside down, sorta hanging it down from the flowers. 
I just love the chipboard hearts that you can see I inked 
bright pink and placed it hanging down from the photo.


Lots of layers of scrap pattern papers under photo and 
I popped a heart frame between the layers.
You can see all the different stamps 
I've used in this
photo.


I love the range of flowers that D-lish have and the ones I have 
used on this layout are some of my favs.
You can see I added some ink splatters around the page.


I thought this was just a perfect title compliments of ScrapFX.
The ribbon that I have used is from Green Tara and you pull the 
string threaded through it and it collects to 
form this bow, love it.

Some of the products that I have used.
Card stock
Impasto
Archival inks
Kaiser stamps
Green Tara ribbon
Green Tara flowers
Lace
ScrapFX chipboard
D-lish goodies


Thanks for stopping by
till next time

keep on scrapping

Carol xx

Friday 14 August 2015

" Mischief Maker "

Hello and welcome back to my blog.
Today is another layout as part of the Design Team at  D-lish Scraps.

I get to create 3 layouts each month for D-lish and I only have one more month with this amazing store and even more these awesome ladies.

Today layout is inspired by the August mood board at D-lish. Pop over and have a look its a beauty.

These are my 2 eldest children. You know how each family has at least one child that always seems to play up when the photos are being taken, well I have all 3 in my family. All of them will never let an opportunity to play the fool for a photo get past them.
This was my youngest and their youngest brothers 21st birthday party and they decided to pose for some more memorable photos. I don't think they ever though I would scrap them.. WRONG!!


How much does the title suit this layout??
I have torn the main paper into three sections and placed it on the green cardstock. I used some texture paste and a stencil to make the chandeliers on the background.
The main cluster is positioned like the sketch in the mood board.


My Motex writer in use again, love this toy.
All chipboard has been rubbed with Bronze Inka Gold.


Fussy cut out some flowers and entwined them with my other flowers.
I used ScrapFX cogs also coloured with the bronze Inka Gold.


Lots of layers of papers and doilies behind the photo.
The pearls were a last minute inclusion and I think they soften the page.
I got the entwined metal hearts a few years ago now and I use them heaps.


I love these little butterflies which were on left over paper
in my stash. I fussy cut some out as they matched the 
colours perfectly.


The heart in this photo is from Scrap FX too and I think
it looks so pretty with the cogs, flowers and the butterfly

This is the fantastic mood board for the month of August
there is still time to get your entry in..


Some products used...
Card stock
pattern paper
pearls
Green Tara flowers
ScrapFX chipboard
Inka Gold paste
D-lish embellishments
Kaiser cutouts

Thanks for stopping by 
Till next time
keep on scrapping

Carol xx


Thursday 13 August 2015

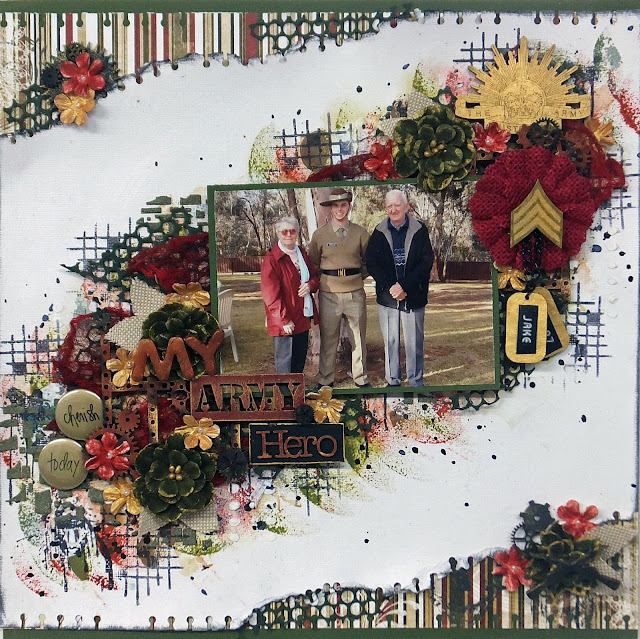
" My Army Hero "

Hello and welcome to my little blog.
Today I am sharing a layout I created as part of the Design Team at D-lish Scraps

I decided to revisit some of the very early layouts that I did when I first started scrapping some 3 years ago. You know the embarrassing ones that no one gets to see anymore. Well I am redoing some of the real bad ones and this photo was from one of those... enjoy

This is a photo of my son Jake with his maternal grandparents on his marching out day. What a very special day for all of us especially me,  his Mum. He looked so shinny in his uniform and I don't think I have ever been as proud of him as I was on that day. 

Mum and Dad were given the best seating at the parade ground and I have never seen such pride on my Dad's face as I saw that day. Watching his grandson march on the parade ground like he had done many years ago was just wonderful feeling for him.


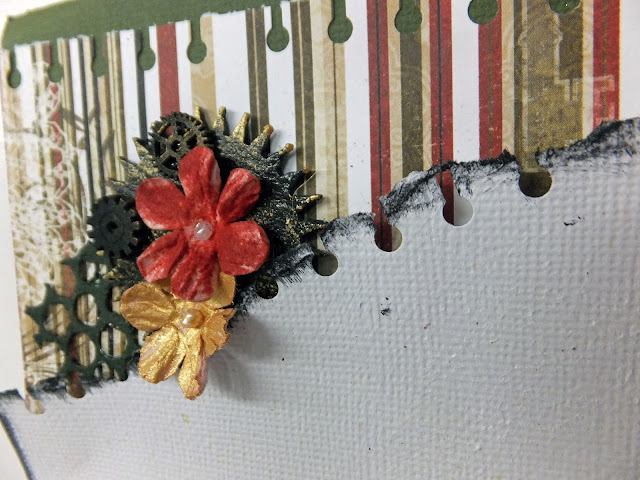
Tearing papers on an angle seems to be the in thing at the moment and I find myself doing it a bit on my layouts to. For this one I have torn the top and bottom corners off to show the striped paper underneath. I coloured some punchinella to match the colours of the layout.

The colours in the background are matching the Army cammo colours and I added some black stamping


My title was done in 3 parts. Army and Hero came from a Scrap FX pack. I split, painted them and rubbed Inka Gold on the edges. The MY was from my stash of leftovers.
Most of the flowers has to be inked to get them to match the layout then I edged them in the Inka Gold too.


Inked some tulle  for the background. A couple of D-lish flairs. I cut out 
the leaves from some hessian I had in my stash. I love the metal pipe and cogs chipboard 
from Scrap FX, inked and Inka Gold and finished it off with black ink.


The Army pack from Scrap FX was such great value, it had the rising sun emblem in
 it plus the rank, dogtags, guns, truck and tank. 
You will see bits and pieces from the pack in the rest of the photos.


I love this big red burlap flower from D-lish n this photo.
You can see those little Army pieces in this one too.
I recently purchased my Motex writer and printed out
name and rank on the dogtags.


Punching along the edges always looks good.


Some of the products used.
Cardstock
Bo Bunny paper
D-lish products
Flowers
Tulle
Flairs
Scrap FX chipboard
Scrap FX Army pack
Punchinella
Jo Sonja paints
Distress inks
Inka Gold
Hessian

Thanks for stopping by
till next time 
Keep on scrapping

Carol xx


Monday 10 August 2015

" Love You to the Moon and Back "


Hi everyone and welcome
.This is a layout I did last month for D-lish Scraps as part of the Design Team.
I used the sketch from last month Inspiration Board.

This photo is of my daughter-in-law Laura. The photo was taken a few years ago now but I think it fits this layout perfectly. 


I love the effect of bokeh on the background paper. 
I added some stars .with texture paste and some dark blue paint splatters.


I love these large flowers with the wooden centre. All the flowers and
chipboard are all available from D-lish Scraps .


I adore the chipboard  hanging down in this pic. They are clusters 
of hearts and I they remind me of fireworks. I added glitter to make them sparkle.
Then I added the fussy cut photo which is just so cute.


I use the has tag stamping on th background and use it on alot of my layouts.
I used the love in the frame as part of the title and added the you and then the circle
was part of a pack of stickers that I had in my stash.
In this layout I decided not to distress for something different, I like it.


Lots of layers and tags under this photo. Some brown hessian poking 
out from underneath some of the flowers. I sprayed a couple 
of doilies in dark blue ink but you can't see them in this pic.

Thanks for stopping by
and till next time 
keep on scrapping

Carol xx 


Sunday 9 August 2015

" Woo Hoo " My 2 page feature in Australian Scrapbook Ideas "

Hi everyone...
This is my showoff post.
Recently I was asked if I would like to create some layouts for a very well known scrapbook magazine, Australian Scrapbook Ideas. Well as you can imagine I jumped at the chance to do it.
I was so excited and nervous.

When the details came though I realised that the mag wanted not one, not two but 2 Double layouts, WOW !! Now I was really nervous.
Criteria: 2 doubles using only the colours red, white and pink. Oh and hearts lots and lots of them.
This was a real challenge as I don't do doubles and them to do them for a mag with limited colours and hearts.
But I did them and am more than happy with the way they turned out.

I know they were published  awhile ago and to tell you the truth  I had completely forgotten and never did the post for them, so here it is. I hope you like them.


The first set of doubles........


 This is one of the photos from the photo booth that we had for Christmas. It is 4 generations of girls in my family. My Mum, me, my daughter Kyra and her 2 daughters Emelia and Eliza


Lots of layers with Washi tape. I used red Gelatos to get the colour on the background. I played with the photos leaving the frames red and making the rest of the photo black and white. The red frame on the photo meant that I didn't need to matt the photos. All the chipboard was inked red or painted white. I made some bows and love the material white roses with the green leaves. I handmade the little hearts that are scattered throughout the layout. Some black stamping finished off the layout,
.

                            The second set of doubles ........


These photos were taken at our wedding. We had all our photos taken before we were married. We now have photos in gardens, beach shots, rocks and in private gardens. I converted them into black and white.


For these layouts I tore strips off the bottom and the top of the pages, added some lace and the floral paper into the layers. I cuts out thousands (seemed like it) of little hearts on my Brother scan and cut. I adhered then across the 2 pages linking the photos. I love the way my hubby looks like he is looking up and I look like I'm looking down. The title says " 10 reasons why I love you" So I made up my 10 reasons and placed then across the heart trail. The leafy flourish I painted green and added roses. The longest part of the whole process was painting a black line around each of the hearts.


These are the pages from the magazine..


You can imagine my excitement when I was approached to do this..
Although I was so excited I was also very sad as this was the last edition of Australian Scrapbook Idea to be published.

Thanks for stopping by
and till next time
keep on scrapping

Carol xx

Saturday 8 August 2015

" Lifes a Beach "


Hi everyone and thanks for stopping by.
Today I am happy to share a layout that I did for Color, Stories and Inspiration as part of the Design Team.
This is for Major Case File 172.

These photos were taken at the beautiful Jimbaran Bay in the wonderful country of Bali.
I decided to surprise my hubby for his 50th birthday and our anniversary (yes we married on his birthday) and take him to Bali for a holiday.
This was so special to him because I have a chronic fear of flying so for me to organise the whole trip including me getting on a plane was huge and he knew it. I gave him the present 2 days before we were due to fly out. 
On his birthday I gave him a box of wishes. In the box was
 1 Million Rupiah, he always wanted to be a millionaire.
2 airline tickets, he knew I didn't fly so this was a big one.
Some spending money and pamphlets to our hotel.
I can't be sure but I think there was a tear or two.

The Case File Elements;
The scheme- turquoise, buttery yellow, deep crimson, grayish teal and taupe. all present.
The Evidence; I used map print (in the layers) travel elements, nautical elements, wet medium, string, mesh, metal and clock part.
The testimony;  I printed up some of the postcards and journalled on them and then popped them behind the photos.
This is what it says, Jimbaran Bay, 2011 in beautiful Bali. Sitting on the beach having a seafood feast watching the magnificent sunset, being treated like a king and queen.
 I surprised you with a magical trip for  your 50th birthday. I made a huge sacrifice and walked onto a plane just to take you on a holiday that you would always remember. I made you a millionaire, not in aussie money but you never specified which currency. We had a wonderful trip jam packed full of memories of laughter, amazement, wonder and above all, of us being together.


Major Case File 172 with the sketch by Emma Stafrace.
Don't forget this cse file goes for the whole month
so you have heaps of time to get you entries in.

Now for some closeups and details


Distressed all the edges. The Green Tara flowers
clustered with shells and the little thongs.
I added an anchor with some chain coming off it. I added little
bits and bobs to the clusters like the cameras.


\\
 These four photos are stunning with the sunset in the background 
and just suit the sketch so well. I love he postcards that are available to print out on this case file. I used 3 and added the string for my journalling.
I used a Kaiser cutouts for this layouts. The pack had lots of beachy bits in it.
I loved the palm tress. Bits of string coming out from the sides of the photo all add to 
that beachy feel.


I had the surfboard floating around in my stash so I covered it with some paper and 
using my Motex writer I wrote the title on it. The anchor and star fish were in the pack. I added the camera and  clock face were in my stash.


This banner was a last minute inclusion as they were in the beach pack
and I spied them as I was putting it away. Thongs and some string finished 
it off, To finish the whole layout I splattered white gesso over everything and wiped it
over the flowers.

Thanks for stopping by
and till next time 
keep on scrapping 

Carol xx


Friday 7 August 2015

" Dies ,dies and more dies "

Hi all just wanted to pop in and show you the new way I'm storing all my dies.


Anita from Anita's Dies on Face book sent me a pic of the fantastic way of storing your dies. Anita sells the magnetic sheets that they stick to. I have had my sheets for a while so although they are not that magnetic maybe one day I will replace them.


Must say I am using more of my dies now that they are all out on display. 
Thanks Anita.

Thanks for stopping by 
enjoy your day

Carol xx

Monday 3 August 2015

" My mini ink holder "

 Hi everyone
just popping in to show you all what I think is a clever little idea that I came up with.

For all of you out there that do mixed media or use alot of different inks on your creations.

I am one of those and seem to have alot of inks open at one time. I unfortunately knocked over one of my ink bottles. lucky for me I grabbed it and only lost about half.

This was my idea and of course I asked my very supportive hubby to make it for me.


I figured 6 slots were the perfect amount.


He wanted to paint it for me
but I figure enough inks will be dripped
over time to cover it beautifully.


He made the slots a little on the big side but
as most mistakes are, this one worked 
out fantastic because I can put the lids
down the side of the bottle.


If you wanted to you can l;eave the brushed in the
bottles while your working because
they wont spill over.

I hope you like my idea of my " Mini Ink holder "

Thanks for stopping by
till next time

keep on scrapping

Carol xx